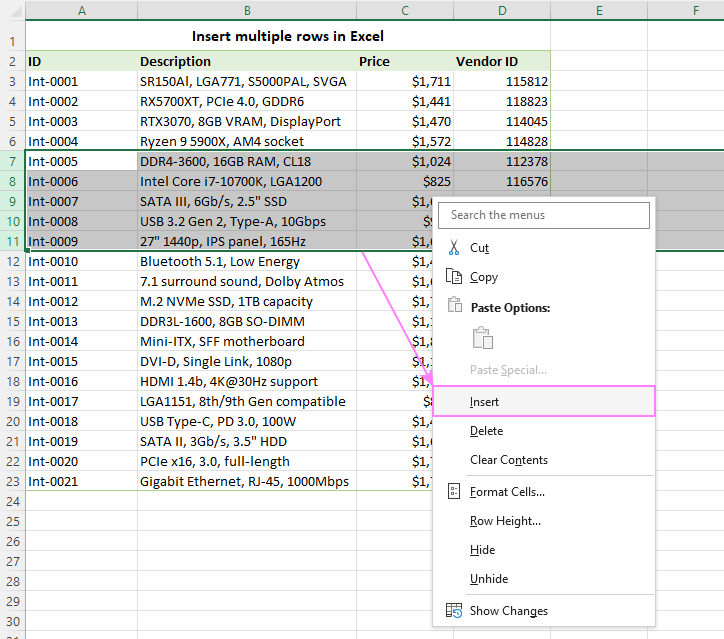
How to insert a row in excel Inserting a row in Excel is a straightforward process that can greatly enhance your data management. To begin, select the row below the position where you want the new row to appear. You can do this by clicking on the row number on the left side of the screen. Once the row is selected, right-click on it and choose “Insert” from the context menu. This action will insert a new row above the selected one, shifting all existing rows down. Alternatively, you can use the Ribbon: go to the “Home” tab, find the “Cells” group, click on the “Insert” dropdown arrow, and select “Insert Sheet Rows.” For keyboard enthusiasts, pressing “Ctrl” + “Shift” + “+” after selecting a row is a quick way to insert a new row. These methods ensure you can quickly and efficiently organize your data without disrupting your workflow.

Basic Method to Insert a Row
- Select the Row: Click on the row number below where you want the new row to be inserted.
- Right-Click: Right-click the selected row to open the context menu.
- Choose “Insert”: From the context menu, select the “Insert” option.
- Row Inserted: A new row will be inserted above the selected row.
- Use Ribbon Menu: Go to the “Home” tab, click the “Insert” dropdown in the “Cells” group, and select “Insert Sheet Rows.”
- Keyboard Shortcut: Use the shortcut “Ctrl” + “Shift” + “+” to quickly insert a row after selecting the target row.
Inserting Multiple Rows at Once
- Select Multiple Rows: Highlight the number of rows you want to insert by clicking and dragging over the row numbers on the left. For example, to insert three new rows, select three existing rows.
- Right-Click Selection: Right-click on the selected rows to open the context menu.
- Choose “Insert”: Click on the “Insert” option in the context menu.
- Rows Inserted: The same number of new rows will be inserted above the selected rows.
- Use Ribbon Menu: Alternatively, go to the “Home” tab, click the “Insert” dropdown in the “Cells” group, and select “Insert Sheet Rows.”
- Keyboard Shortcut: Press “Ctrl” + “Shift” + “+” after selecting multiple rows to insert them quickly.
Inserting Rows with Formulas and Data
- Select the Row: Click on the row number directly below where you want the new rows to be inserted.
- Right-Click the Selection: Right-click the selected row to open the context menu.
- Choose “Insert”: From the context menu, select “Insert.” A new row will be inserted above the selected row.
- Copy Formulas and Data:
- Formulas: If the row above contains formulas, they can be copied down. Click and drag the fill handle (small square at the bottom right of the cell) to copy formulas into the new row.
- Data: Manually enter or copy-paste the data into the new row as needed.
- Use the Ribbon Menu: Go to the “Home” tab, click the “Insert” dropdown in the “Cells” group, and select “Insert Sheet Rows.”
- Keyboard Shortcut: Use “Ctrl” + “Shift” + “+” after selecting the row to insert a new row quickly
Common Errors and Troubleshooting
- Error: “Cannot shift objects off sheet”
- Cause: This occurs when there are comments, images, or other objects that can’t be moved.
- Solution: Go to
File>Options>Advanced, scroll toDisplay options for this workbook, and chooseAllunderFor objects, show.2. Error: “The selection is invalid”
- Cause: This happens if the selection includes merged cells.
- Solution: Unmerge the cells before attempting to insert a row. Go to
Home>Merge & Center>Unmerge Cells.3. Error: Rows are not inserted correctly with VBA
- Cause: The range specified in VBA might be incorrect.
- Solution: Double-check the row number or range in your VBA code to ensure it matches your intention.
4. Error: “Run-time error ‘1004’”
- Cause: This typically occurs if the specified range is invalid.
- Solution: Ensure the row number or range in the VBA code is within the valid range of the worksheet.5Data or Formulas Not Copying Correctly
- Cause: Copying may not be capturing formulas properly.
- Solution: Use the fill handle to drag and copy formulas into the new row. Ensure formulas are set to update based on relative cell references.
Conclusion
How to insert a row in Excel is a fundamental task that can be accomplished through various methods, including basic insertion, using keyboard shortcuts, leveraging VBA for automation, and ensuring formulas and data integrity. Understanding how to troubleshoot common errors ensures a smoother experience and helps maintain the accuracy and efficiency of your spreadsheet operations. Whether you are dealing with a simple data set or a complex spreadsheet, mastering these techniques will significantly enhance your productivity and proficiency in Excel.
FAQs
Q: 1How do I insert a row in Excel?
Ans: To insert a row in Excel, select the row below where you want the new row to appear. Right-click and choose “Insert” from the context menu. Alternatively, use the keyboard shortcut Ctrl + Shift + + (plus sign).
Q:2 Can I insert multiple rows at once?
Ans: Yes, you can insert multiple rows simultaneously. Select the number of rows you want to insert, right-click, and choose “Insert” from the menu. This method allows you to insert multiple blank rows quickly.
Q:3 What happens to existing data when I insert a row?
Ans When you insert a row, existing data below the insertion point shifts down to make room for the new row. Formulas adjust automatically to accommodate the new row.
Q: 4.Why do I get an error when inserting rows sometimes?
Ans: Errors like “Cannot shift objects off sheet” may occur if there are non-moveable objects like shapes or comments in the way. Adjust Excel settings to display all objects or move them manually before inserting rows.


